Monday, July 30, 2012

Using ItemizedOverlay to add marker on MapView

Reference last exercise MapView and MapActivity, we are going to add overlay of ItemizedOverlay, to add marker on our MapView.
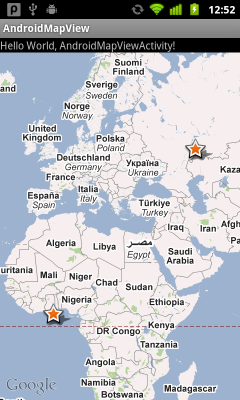
Using ItemizedOverlay to add marker on MapView

The main.xml and AndroidManifest.xml are kept as in last postMapView and MapActivity.

Add a new class MyItemizedOverlay.java extends ItemizedOverlay.
package com.AndroidMapView;

import java.util.ArrayList;

import android.graphics.Canvas;
import android.graphics.drawable.Drawable;

import com.google.android.maps.GeoPoint;
import com.google.android.maps.ItemizedOverlay;
import com.google.android.maps.MapView;
import com.google.android.maps.OverlayItem;

public class MyItemizedOverlay extends ItemizedOverlay<OverlayItem>{

private ArrayList<OverlayItem> overlayItemList = new ArrayList<OverlayItem>();

public MyItemizedOverlay(Drawable marker) {
super(boundCenterBottom(marker));
// TODO Auto-generated constructor stub

populate();
}

public void addItem(GeoPoint p, String title, String snippet){
OverlayItem newItem = new OverlayItem(p, title, snippet);
overlayItemList.add(newItem);
   populate();
}

@Override
protected OverlayItem createItem(int i) {
// TODO Auto-generated method stub
return overlayItemList.get(i);
}

@Override
public int size() {
// TODO Auto-generated method stub
return overlayItemList.size();
}

@Override
public void draw(Canvas canvas, MapView mapView, boolean shadow) {
// TODO Auto-generated method stub
super.draw(canvas, mapView, shadow);
//boundCenterBottom(marker);
}

}


Modify our main class AndroidMapViewActivity.java to add ItemizedOverlay on ur MapView.
package com.AndroidMapView;

import com.google.android.maps.GeoPoint;
import com.google.android.maps.MapActivity;
import com.google.android.maps.MapView;
import android.graphics.drawable.Drawable;
import android.os.Bundle;

public class AndroidMapViewActivity extends MapActivity {
 /** Called when the activity is first created. */
 @Override
 public void onCreate(Bundle savedInstanceState) {
     super.onCreate(savedInstanceState);
     setContentView(R.layout.main);
     MapView mapView = (MapView) findViewById(R.id.mapview);
     mapView.setBuiltInZoomControls(true);
  
     Drawable marker=getResources().getDrawable(android.R.drawable.star_big_on);
     int markerWidth = marker.getIntrinsicWidth();
     int markerHeight = marker.getIntrinsicHeight();
     marker.setBounds(0, markerHeight, markerWidth, 0);

  
     MyItemizedOverlay myItemizedOverlay = new MyItemizedOverlay(marker);
     mapView.getOverlays().add(myItemizedOverlay);
  
     GeoPoint myPoint1 = new GeoPoint(0*1000000, 0*1000000);
     myItemizedOverlay.addItem(myPoint1, "myPoint1", "myPoint1");
     GeoPoint myPoint2 = new GeoPoint(50*1000000, 50*1000000);
     myItemizedOverlay.addItem(myPoint2, "myPoint2", "myPoint2");

 }

@Override
protected boolean isLocationDisplayed() {
// TODO Auto-generated method stub
return false;
}

@Override
protected boolean isRouteDisplayed() {
// TODO Auto-generated method stub
return false;
}

}
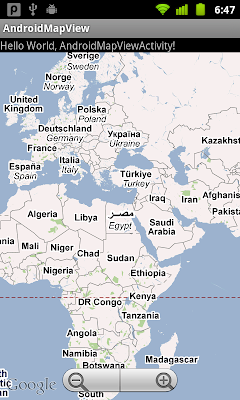
MapView and MapActivity in Android

Using the Google Maps library, you can create your own map-viewing Activity.

MapView and MapActivity

By default the Android SDK includes the Google APIs add-on, which in turn includes the Maps external library. The Google APIs add-on requires Android 1.5 SDK or later release.

Create a Android project with build target called "Google APIs".

Modify AndroidManifest.xml to include uses-library "com.google.android.maps", and grant permission of "android.permission.INTERNET".
<?xml version="1.0" encoding="utf-8"?>
<manifest xmlns:android="http://schemas.android.com/apk/res/android"
    package="com.AndroidMapView"
    android:versionCode="1"
    android:versionName="1.0">
  <uses-sdk android:minSdkVersion="4" />

  <application android:icon="@drawable/icon" android:label="@string/app_name">
   <uses-library android:name="com.google.android.maps" />
      <activity android:name=".AndroidMapViewActivity"
                android:label="@string/app_name">
          <intent-filter>
              <action android:name="android.intent.action.MAIN" />
              <category android:name="android.intent.category.LAUNCHER" />
          </intent-filter>
      </activity>
  </application>
<uses-permission android:name="android.permission.INTERNET"/>
</manifest>


To embed a MapView in your app, you have to obtain a Maps API key, refer to this post.

Modify main.xml to add com.google.android.maps.MapView, with your own Maps API Key.
<?xml version="1.0" encoding="utf-8"?>
<LinearLayout xmlns:android="http://schemas.android.com/apk/res/android"
  android:orientation="vertical"
  android:layout_width="fill_parent"
  android:layout_height="fill_parent"
  >
<TextView
  android:layout_width="fill_parent"
  android:layout_height="wrap_content"
  android:text="@string/hello"
  />
<com.google.android.maps.MapView
android:id="@+id/mapview"
android:layout_width="fill_parent"
android:layout_height="fill_parent"
android:clickable="true"
android:apiKey="Your Maps API key here" />
</LinearLayout>


Main activity, extends MapActivity.
package com.AndroidMapView;

import com.google.android.maps.MapActivity;
import com.google.android.maps.MapView;

import android.os.Bundle;

public class AndroidMapViewActivity extends MapActivity {
  /** Called when the activity is first created. */
  @Override
  public void onCreate(Bundle savedInstanceState) {
      super.onCreate(savedInstanceState);
      setContentView(R.layout.main);
      MapView mapView = (MapView) findViewById(R.id.mapview);
      mapView.setBuiltInZoomControls(true);
  }

@Override
protected boolean isRouteDisplayed() {
 // TODO Auto-generated method stub
 return false;
}
}

MapView and Maps API Key in Android

The MapView class in the Maps external library is a very useful class that lets you easily integrate Google Maps into your application. It provides built-in map downloading, rendering, and caching of Maps tiles, as well as a variety of display options and controls. It provides a wrapper around the Google Maps API that lets your application request and manipulate Google Maps data through class methods, and it lets you work with Maps data as you would other types of Views.

Because MapView gives you access to Google Maps data, you need to register with the Google Maps service and agree to the applicable Terms of Service before your MapView will be able to obtain data from Google Maps. This will apply whether you are developing your application on the emulator or preparing your application for deployment to mobile devices.

Registering for a Maps API Key is simple, free, and has two parts:

- Registering the MD5 fingerprint of the certificate that you will use to sign your application. The Maps registration service then provides you a Maps API Key that is associated with your application's signer certificate.

- Adding a reference to the Maps API Key in each MapView, whether declared in XML or instantiated directly from code. You can use the same Maps API Key for any MapView in any Android application, provided that the application is signed with the certificate whose fingerprint you registered with the service.

Google document, Obtaining a Maps API Key, have instructions on how to obtain and use your Maps API Key:
  • Overview
  • Getting the MD5 Fingerprint of Your Signing Certificate

  • Getting the MD5 Fingerprint of the SDK Debug Certificate
  • Registering the Certificate Fingerprint with the Google Maps Service
  • Adding the Maps API Key to your Application
  • Final Steps to Enable MapView Elements

Display a icon/image on button using Java code

The method setCompoundDrawablesWithIntrinsicBounds(int left, int top, int right, int bottom) sets the Drawables (if any) to appear to the left of, above, to the right of, and below the text. Use 0 if you do not want a Drawable there. The Drawables' bounds will be set to their intrinsic bounds.

example:
        Button imageButton = (Button)findViewById(R.id.imagebutton);
        imageButton.setCompoundDrawablesWithIntrinsicBounds(
          0,     //left 
          0,      //top
          R.drawable.icon,  //right
          0);     //bottom


Display a icon/image on button using Java code

Reduce Bitmap size using BitmapFactory.Options.inSampleSize

In the post "Load ImageView with JPG file in SD Card", the ImageView is loaded with bitmap in full-size. It cost too much resources for a mobile device, and easy to make the app closed unexpectly.

We can generate a shrinked bitmap using BitmapFactory.Optionswith inSampleSize; such that to reduce the needed resources greatly.

package com.AndroidLoadImageView;

import android.app.Activity;
import android.graphics.Bitmap;
import android.graphics.BitmapFactory;
import android.os.Bundle;
import android.widget.ImageView;

public class AndroidLoadImageViewActivity extends Activity {
 
 String imagefile ="/sdcard/IMG_9331.JPG";
 
    /** Called when the activity is first created. */
    @Override
    public void onCreate(Bundle savedInstanceState) {
        super.onCreate(savedInstanceState);
        setContentView(R.layout.main);
        
        ImageView image = (ImageView)findViewById(R.id.image);
        //Bitmap bm = BitmapFactory.decodeFile(imagefile);
        Bitmap bm = ShrinkBitmap(imagefile, 300, 300);
        image.setImageBitmap(bm);
    }
    
 Bitmap ShrinkBitmap(String file, int width, int height){
  
     BitmapFactory.Options bmpFactoryOptions = new BitmapFactory.Options();
        bmpFactoryOptions.inJustDecodeBounds = true;
        Bitmap bitmap = BitmapFactory.decodeFile(file, bmpFactoryOptions);
        
        int heightRatio = (int)Math.ceil(bmpFactoryOptions.outHeight/(float)height);
        int widthRatio = (int)Math.ceil(bmpFactoryOptions.outWidth/(float)width);
        
        if (heightRatio > 1 || widthRatio > 1)
        {
         if (heightRatio > widthRatio)
         {
          bmpFactoryOptions.inSampleSize = heightRatio;
         } else {
          bmpFactoryOptions.inSampleSize = widthRatio; 
         }
        }
        
        bmpFactoryOptions.inJustDecodeBounds = false;
        bitmap = BitmapFactory.decodeFile(file, bmpFactoryOptions);
     return bitmap;
    }
}

Settings.ACTION_LOCATION_SOURCE_SETTINGS vs. Settings.ACTION_SECURITY_SETTINGS

As described in my old post, we can "Start Location setting if GPS disabled" by start activity with intent of "Settings.ACTION_SECURITY_SETTINGS".

Thanks for Brian comments:

It is better to use Settings.ACTION_LOCATION_SOURCE_SETTINGS instead of Settings.ACTION_SECURITY_SETTINGS.

The reason is that some phones (such as HTC Desire) have moved the GPS settings out of the Security page. Using the suggested intent gets the user to the GPS settings wherever they are.


Set GPS

package com.AndroidGPS;

import android.app.Activity;
import android.content.ContentResolver;
import android.content.Intent;
import android.location.LocationManager;
import android.os.Bundle;
import android.provider.Settings;
import android.view.View;
import android.widget.Button;
import android.widget.TextView;

public class AndroidGPS extends Activity {
 
 TextView textGpsStatus;
 Button buttonSetGPS_ACTION_LOCATION_SOURCE_SETTINGS;
 Button buttonSetGPS_ACTION_SECURITY_SETTINGS;
 
  /** Called when the activity is first created. */
  @Override
  public void onCreate(Bundle savedInstanceState) {
      super.onCreate(savedInstanceState);
      setContentView(R.layout.main);
      textGpsStatus = (TextView)findViewById(R.id.gpsstatus);
    
      buttonSetGPS_ACTION_LOCATION_SOURCE_SETTINGS
       = (Button)findViewById(R.id.setgps_ACTION_LOCATION_SOURCE_SETTINGS);  
    
      buttonSetGPS_ACTION_LOCATION_SOURCE_SETTINGS.setOnClickListener(new Button.OnClickListener(){

   @Override
   public void onClick(View arg0) {
    // TODO Auto-generated method stub
    Intent intent = new Intent(Settings.ACTION_LOCATION_SOURCE_SETTINGS);
       startActivity(intent);
   }});
    
      buttonSetGPS_ACTION_SECURITY_SETTINGS
   = (Button)findViewById(R.id.setgps_ACTION_SECURITY_SETTINGS);  

      buttonSetGPS_ACTION_SECURITY_SETTINGS.setOnClickListener(new Button.OnClickListener(){

  @Override
  public void onClick(View arg0) {
   // TODO Auto-generated method stub
   Intent intent = new Intent(Settings.ACTION_SECURITY_SETTINGS);
      startActivity(intent);
  }});

  }

  @Override
 protected void onResume() {
  // TODO Auto-generated method stub
  super.onResume();
  displayGpsStatus();
 }

 private void displayGpsStatus(){
   ContentResolver contentResolver = getBaseContext().getContentResolver();
      boolean gpsStatus = Settings.Secure.isLocationProviderEnabled(contentResolver, LocationManager.GPS_PROVIDER);
      if(gpsStatus){
       textGpsStatus.setText("GPS: ON");
      }else{
       textGpsStatus.setText("GPS: OFF");
      }
  }
}


<?xml version="1.0" encoding="utf-8"?>
<LinearLayout xmlns:android="http://schemas.android.com/apk/res/android"
  android:orientation="vertical"
  android:layout_width="fill_parent"
  android:layout_height="fill_parent"
  >
<TextView
  android:layout_width="fill_parent"
  android:layout_height="wrap_content"
  android:text="@string/hello"
  />
<TextView
  android:id="@+id/gpsstatus"
  android:layout_width="fill_parent"
  android:layout_height="wrap_content"
  />
<Button
  android:id="@+id/setgps_ACTION_LOCATION_SOURCE_SETTINGS"
  android:layout_width="fill_parent"
  android:layout_height="wrap_content"
  android:text="Turn On/Off GPS Using ACTION_LOCATION_SOURCE_SETTINGS"
  />
<Button
  android:id="@+id/setgps_ACTION_SECURITY_SETTINGS"
  android:layout_width="fill_parent"
  android:layout_height="wrap_content"
  android:text="Turn On/Off GPS Using ACTION_SECURITY_SETTINGS"
  />
</LinearLayout>

Start Google Maps using intent of ACTION_VIEW in Andorid

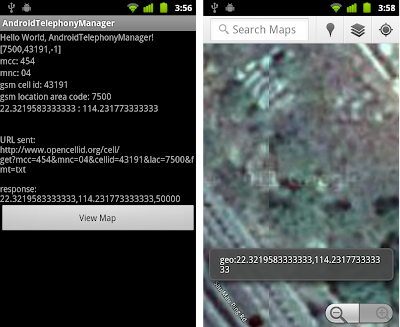
To start Android geo viewer, Google Maps, we can start activity with intent "android.content.Intent.ACTION_VIEW", with Uri of "geo:latitude,longitude".

Modify last post "Get location of Cell ID, from opencellid.org using HttpGet()", start Google Maps with the location returned from OpenCellID.

geo:latitude,longitude

AndroidTelephonyManager.java
package com.AndroidTelephonyManager;

import org.apache.http.HttpResponse;
import org.apache.http.client.HttpClient;
import org.apache.http.client.methods.HttpGet;
import org.apache.http.impl.client.DefaultHttpClient;
import org.apache.http.util.EntityUtils;

import android.app.Activity;
import android.content.Context;
import android.content.Intent;
import android.net.Uri;
import android.os.Bundle;
import android.telephony.TelephonyManager;
import android.telephony.gsm.GsmCellLocation;
import android.view.View;
import android.widget.Button;
import android.widget.TextView;
import android.widget.Toast;

public class AndroidTelephonyManager extends Activity {

public class OpenCellID {
 String mcc;  //Mobile Country Code
 String mnc;  //mobile network code
 String cellid; //Cell ID
 String lac;  //Location Area Code

 Boolean error;
 String strURLSent;
 String GetOpenCellID_fullresult;

 String latitude;
 String longitude;

 public Boolean isError(){
  return error;
 }

 public void setMcc(String value){
  mcc = value;
 }

 public void setMnc(String value){
  mnc = value;
 }

 public void setCallID(int value){
  cellid = String.valueOf(value);
 }

 public void setCallLac(int value){
  lac = String.valueOf(value);
 }

 public String getLocation(){
  return(latitude + " : " + longitude);
 }

 public String getLatitude(){
  return latitude;
 }

 public String getLongitude(){
  return longitude;
 }

 public void groupURLSent(){
  strURLSent =
   "http://www.opencellid.org/cell/get?mcc=" + mcc
   +"&mnc=" + mnc
   +"&cellid=" + cellid
   +"&lac=" + lac
   +"&fmt=txt";
 }

 public String getstrURLSent(){
  return strURLSent;
 }

 public String getGetOpenCellID_fullresult(){
  return GetOpenCellID_fullresult;
 }

 public void GetOpenCellID() throws Exception {
  groupURLSent();
  HttpClient client = new DefaultHttpClient();
  HttpGet request = new HttpGet(strURLSent);
  HttpResponse response = client.execute(request);
  GetOpenCellID_fullresult = EntityUtils.toString(response.getEntity());
  spliteResult();
 }

 private void spliteResult(){
  if(GetOpenCellID_fullresult.equalsIgnoreCase("err")){
   error = true;
  }else{
   error = false;
   String[] tResult = GetOpenCellID_fullresult.split(",");
   latitude = tResult[0];
   longitude = tResult[1];
  }
  
 
 }
}

int myLatitude, myLongitude;
OpenCellID openCellID;


   /** Called when the activity is first created. */
   @Override
   public void onCreate(Bundle savedInstanceState) {
       super.onCreate(savedInstanceState);
       setContentView(R.layout.main);
       TextView textGsmCellLocation = (TextView)findViewById(R.id.gsmcelllocation);
       TextView textMCC = (TextView)findViewById(R.id.mcc);
       TextView textMNC = (TextView)findViewById(R.id.mnc);
       TextView textCID = (TextView)findViewById(R.id.cid);
       TextView textLAC = (TextView)findViewById(R.id.lac);
       TextView textGeo = (TextView)findViewById(R.id.geo);
       TextView textRemark = (TextView)findViewById(R.id.remark);
      
       Button btnViewMap = (Button)findViewById(R.id.viewmap);
       btnViewMap.setOnClickListener(new Button.OnClickListener(){

  @Override
  public void onClick(View arg0) {
   // TODO Auto-generated method stub
   String stringLoc = "geo:" + openCellID.getLatitude() + "," + openCellID.getLongitude();
  
   Toast.makeText(AndroidTelephonyManager.this, stringLoc, Toast.LENGTH_LONG).show();
  
   Intent intent = new Intent(android.content.Intent.ACTION_VIEW, Uri.parse(stringLoc));
   startActivity(intent);
  }});
      
       //retrieve a reference to an instance of TelephonyManager
       TelephonyManager telephonyManager = (TelephonyManager)getSystemService(Context.TELEPHONY_SERVICE);
       GsmCellLocation cellLocation = (GsmCellLocation)telephonyManager.getCellLocation();
      
       String networkOperator = telephonyManager.getNetworkOperator();
       String mcc = networkOperator.substring(0, 3);
       String mnc = networkOperator.substring(3);
       textMCC.setText("mcc: " + mcc);
       textMNC.setText("mnc: " + mnc);
      
       int cid = cellLocation.getCid();
       int lac = cellLocation.getLac();
       textGsmCellLocation.setText(cellLocation.toString());
       textCID.setText("gsm cell id: " + String.valueOf(cid));
       textLAC.setText("gsm location area code: " + String.valueOf(lac));
      
       openCellID = new OpenCellID();
      
       openCellID.setMcc(mcc);
       openCellID.setMnc(mnc);
       openCellID.setCallID(cid);
       openCellID.setCallLac(lac);
       try {
  openCellID.GetOpenCellID();
 
  if(!openCellID.isError()){
   textGeo.setText(openCellID.getLocation());
   textRemark.setText( "\n\n"
     + "URL sent: \n" + openCellID.getstrURLSent() + "\n\n"
     + "response: \n" + openCellID.GetOpenCellID_fullresult);
  }else{
   textGeo.setText("Error");
  }
 } catch (Exception e) {
  // TODO Auto-generated catch block
  e.printStackTrace();
  textGeo.setText("Exception: " + e.toString());
 }
   }   
}


main.xml
<?xml version="1.0" encoding="utf-8"?>
<LinearLayout xmlns:android="http://schemas.android.com/apk/res/android"
   android:orientation="vertical"
   android:layout_width="fill_parent"
   android:layout_height="fill_parent"
   >
<TextView 
   android:layout_width="fill_parent"
   android:layout_height="wrap_content"
   android:text="@string/hello"
   />
<TextView 
   android:id="@+id/gsmcelllocation"
   android:layout_width="fill_parent"
   android:layout_height="wrap_content"
   />
<TextView 
   android:id="@+id/mcc"
   android:layout_width="fill_parent"
   android:layout_height="wrap_content"
   />
<TextView 
   android:id="@+id/mnc"
   android:layout_width="fill_parent"
   android:layout_height="wrap_content"
   />
<TextView 
   android:id="@+id/cid"
   android:layout_width="fill_parent"
   android:layout_height="wrap_content"
   />
<TextView 
   android:id="@+id/lac"
   android:layout_width="fill_parent"
   android:layout_height="wrap_content"
   />
<TextView 
   android:id="@+id/geo"
   android:layout_width="fill_parent"
   android:layout_height="wrap_content"
   />
<TextView 
   android:id="@+id/remark"
   android:layout_width="fill_parent"
   android:layout_height="wrap_content"
   />
<Button 
   android:id="@+id/viewmap"
   android:layout_width="fill_parent"
   android:layout_height="wrap_content"
   android:text="View Map"
   />
</LinearLayout>

Get cell location on a GSM phone, getCellLocation() in Android

TelephonyManager.getCellLocation() return the current location of the device.

We need the following permission in this example:
  • android.permission.ACCESS_COARSE_LOCATION
  • android.permission.ACCESS_FINE_LOCATION
  • android.permission.READ_PHONE_STATE


Get cell location on a GSM phone, getCellLocation()

package com.AndroidTelephonyManager;

import android.app.Activity;
import android.content.Context;
import android.os.Bundle;
import android.telephony.TelephonyManager;
import android.telephony.gsm.GsmCellLocation;
import android.widget.TextView;

public class AndroidTelephonyManager extends Activity {
  /** Called when the activity is first created. */
  @Override
  public void onCreate(Bundle savedInstanceState) {
      super.onCreate(savedInstanceState);
      setContentView(R.layout.main);
      TextView textGsmCellLocation = (TextView)findViewById(R.id.gsmcelllocation);
      TextView textCID = (TextView)findViewById(R.id.cid);
      TextView textLAC = (TextView)findViewById(R.id.lac);
    
      //retrieve a reference to an instance of TelephonyManager
      TelephonyManager telephonyManager = (TelephonyManager)getSystemService(Context.TELEPHONY_SERVICE);
      GsmCellLocation cellLocation = (GsmCellLocation)telephonyManager.getCellLocation();
    
      int cid = cellLocation.getCid();
      int lac = cellLocation.getLac();
      textGsmCellLocation.setText(cellLocation.toString());
      textCID.setText("gsm cell id: " + String.valueOf(cid));
      textLAC.setText("gsm location area code: " + String.valueOf(lac));
  }
}


<?xml version="1.0" encoding="utf-8"?>
<LinearLayout xmlns:android="http://schemas.android.com/apk/res/android"
  android:orientation="vertical"
  android:layout_width="fill_parent"
  android:layout_height="fill_parent"
  >
<TextView
  android:layout_width="fill_parent"
  android:layout_height="wrap_content"
  android:text="@string/hello"
  />
<TextView
  android:id="@+id/gsmcelllocation"
  android:layout_width="fill_parent"
  android:layout_height="wrap_content"
  />
<TextView
  android:id="@+id/cid"
  android:layout_width="fill_parent"
  android:layout_height="wrap_content"
  />
<TextView
  android:id="@+id/lac"
  android:layout_width="fill_parent"
  android:layout_height="wrap_content"
  />
</LinearLayout>

Get Network info using TelephonyManager in Android

Using TelephonyManager, we can get cell phone network info; such as Network Operator (MCC+MNC), Network Operator Name, Network Type, Network Country Iso.

Permission READ_PHONE_STATE is required.

Get Network info using TelephonyManager

package com.AndroidTelephonyManager;

import android.app.Activity;
import android.content.Context;
import android.os.Bundle;
import android.telephony.TelephonyManager;
import android.widget.TextView;

public class AndroidTelephonyManager extends Activity {
 /** Called when the activity is first created. */
 @Override
 public void onCreate(Bundle savedInstanceState) {
     super.onCreate(savedInstanceState);
     setContentView(R.layout.main);
     TextView textDeviceID = (TextView)findViewById(R.id.deviceid);
     TextView textNetworkOperator = (TextView)findViewById(R.id.networkoperator);
     TextView textNetworkOperatorName = (TextView)findViewById(R.id.networkoperatorname);
     TextView textNetworkType = (TextView)findViewById(R.id.networktype);
     TextView textNetworkCountryIso = (TextView)findViewById(R.id.networkcountryiso);
  
     //retrieve a reference to an instance of TelephonyManager
     TelephonyManager telephonyManager = (TelephonyManager)getSystemService(Context.TELEPHONY_SERVICE);

     textDeviceID.setText(getDeviceID(telephonyManager));
     textNetworkOperator.setText("Network Operator(MCC+MNC): " + telephonyManager.getNetworkOperator());
     textNetworkOperatorName.setText("Network Operator Name: " + telephonyManager.getNetworkOperatorName());
     textNetworkType.setText("Network Type: " + getNetworkType(telephonyManager));
     textNetworkCountryIso.setText("Network Country Iso:" + telephonyManager.getNetworkCountryIso());
 }

 String getNetworkType(TelephonyManager phonyManager){
  int type = phonyManager.getNetworkType();

  switch(type){
  case TelephonyManager.NETWORK_TYPE_UNKNOWN:
   return "NETWORK_TYPE_UNKNOWN";
  case TelephonyManager.NETWORK_TYPE_GPRS:
   return "NETWORK_TYPE_GPRS";
  case TelephonyManager.NETWORK_TYPE_EDGE:
   return "NETWORK_TYPE_EDGE";
  case TelephonyManager.NETWORK_TYPE_UMTS:
   return "NETWORK_TYPE_UMTS";
  case TelephonyManager.NETWORK_TYPE_HSDPA:
   return "NETWORK_TYPE_HSDPA";
  case TelephonyManager.NETWORK_TYPE_HSUPA:
   return "NETWORK_TYPE_HSUPA";
  case TelephonyManager.NETWORK_TYPE_HSPA:
   return "NETWORK_TYPE_HSPA";
  case TelephonyManager.NETWORK_TYPE_CDMA:
   return "NETWORK_TYPE_CDMA";
  case TelephonyManager.NETWORK_TYPE_EVDO_0:
   return "NETWORK_TYPE_EVDO_0";
  case TelephonyManager.NETWORK_TYPE_EVDO_A:
   return "NETWORK_TYPE_EVDO_0";
  /* Since: API Level 9
   *  case TelephonyManager.NETWORK_TYPE_EVDO_B:
   *  return "NETWORK_TYPE_EVDO_B";
   */
  case TelephonyManager.NETWORK_TYPE_1xRTT:
   return "NETWORK_TYPE_1xRTT";
  case TelephonyManager.NETWORK_TYPE_IDEN:
   return "NETWORK_TYPE_IDEN";
  /* Since: API Level 11
   *  case TelephonyManager.NETWORK_TYPE_LTE:
   * return "NETWORK_TYPE_LTE";
   */
  /* Since: API Level 11
   *  case TelephonyManager.NETWORK_TYPE_EHRPD:
   *  return "NETWORK_TYPE_EHRPD";
   */
  default:
   return "unknown";
 
  }
 }

 String getDeviceID(TelephonyManager phonyManager){

  String id = phonyManager.getDeviceId();

  if (id == null){
   id = "not available";
  }

  int phoneType = phonyManager.getPhoneType();
  switch(phoneType){
  case TelephonyManager.PHONE_TYPE_NONE:
   return "NONE: " + id;

  case TelephonyManager.PHONE_TYPE_GSM:
   return "GSM: IMEI=" + id;

  case TelephonyManager.PHONE_TYPE_CDMA:
   return "CDMA: MEID/ESN=" + id;
 
  /*
   *  for API Level 11 or above
   *  case TelephonyManager.PHONE_TYPE_SIP:
   *   return "SIP";
   */

  default:
   return "UNKNOWN: ID=" + id;
  }

 }
}


<?xml version="1.0" encoding="utf-8"?>
<LinearLayout xmlns:android="http://schemas.android.com/apk/res/android"
 android:orientation="vertical"
 android:layout_width="fill_parent"
 android:layout_height="fill_parent"
 >
<TextView
 android:layout_width="fill_parent"
 android:layout_height="wrap_content"
 android:text="@string/hello"
 />
<TextView
 android:id="@+id/deviceid"
 android:layout_width="fill_parent"
 android:layout_height="wrap_content"
 />
<TextView
 android:id="@+id/networkoperator"
 android:layout_width="fill_parent"
 android:layout_height="wrap_content"
 />
<TextView
 android:id="@+id/networkoperatorname"
 android:layout_width="fill_parent"
 android:layout_height="wrap_content"
 />
<TextView
 android:id="@+id/networktype"
 android:layout_width="fill_parent"
 android:layout_height="wrap_content"
 />
<TextView
 android:id="@+id/networkcountryiso"
 android:layout_width="fill_parent"
 android:layout_height="wrap_content"
 />
</LinearLayout>


Remark:
Getting line number by calling the method getLine1Number() is not always work!
You can check by pressing MENU > Settings > About Phone > Status > My phone nmber = unknown
That means this function have been disabled, even the API is provided.